


Key Steps
1.
2.
3.
Import your audio
Create a fade out
Loop your audio
0 : 11
0 : 34
1 : 13
2.
3.
Create a fade out
Loop your audio
0 : 34
1 : 13
Tips and Tricks
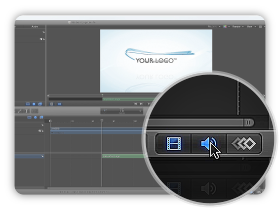
Audio Timeline
The Audio Timeline provides
a view of audio elements over time.
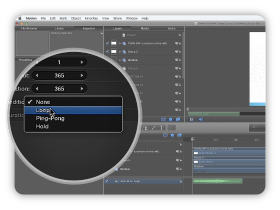
End Condition
Set how playback continues when
the end of the clip is reached.
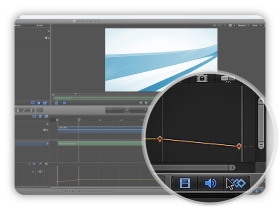
Keyframe Editor
The Keyframe Editor provides a
visualization of changing keyframe values.
Tutorial Transcript
In this new tutorial I will show you how to add your audio and mix it with your template. First you have to open your template, select your audio file and drag it into the Layers panel. Your audio will be added at the current frame. You will notice this audio bar here, but you can activate the Audio timeline to see it as a layer and control it easily. You can select and move your audio where you want into the timeline.
Now I will show you how to create a fade out. Select your audio layer then go into inspector and open the Audio Track panel to show the level slider. In your timeline one second before the end, you can set a keyframe, then place the time locator at the end and turn the audio level to negative infinite. Same at the beginning, turn it off, then after one second, set it to zero. You can open the keyframe editor to see the curve and the two fades you just created.
Now I will show you how to loop your audio. In some case, your project will be longer than your audio so you will need to loop it. Choose an audio file and drag it into the layer panel. Select and move your audio at the beginning of your video. Go into Inspector, Properties. In the Timing panel you can set the End Condition to Loop. To extend your audio you can now change the end duration value below or select your layer into the timeline and extend it. Then as we just saw you can add a fade out. Open the Audio Track panel, go at the end and a keyframe to set to level to negative infinite. Then go back to one second before the end and set the levels to 0.
We hope this tutorial has been useful for you. Feel free to contact us if you have any questions. Thanks for watching !
Comments are closed.